TIME SLIDER AND TRACK BAR
You use the Time Slider to move around the Track Bar. The Track Bar shows you the number of frames currently used in your animation. By default, the frame count is 100 and it approximately results to a 3 second animation. Eventually, you can configure the number of frames and I’ll show you where to do that after I’ll discuss the Status Bar and Key

Figure 1-17. The Lower Interface Bar with the Time Slider and Track Bar.
STATUS BAR
The Status bar indicates the position of your 3D objects on the active viewport. It also contains a description of what will be your next step.

Figure 1-18. The Status Bar.
KEY CONTROLS
These controls allow you to set the key frames when you start animating your objects. You will start using these buttons at the last part of this book.

Figure 1-19. Key Controls with the Auto and Set Keys.
TIME CONTROLS
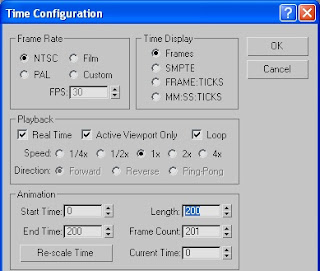
The Time Controls have similar buttons to that of a media player. It has play, pause, move forward, and next buttons. But as I have mentioned, you can change the duration of your animation using the Time Configuration button.
Try This!
1. Click on the Time Configuration button at the lower right end part of the Time Controls.

2. In the Time Configuration dialog box, under the Animation section, change the Length of the animation from 100 to 200 frames. Then, click the OK button.

3. Now, your new Track Bar shows a total of 200 frames.

VIEWPORT NAVIGATION CONTROLS
There are buttons which can help you move around the viewports and these are the Viewport Navigation Controls. I’ll demonstrate some of the most useful of these buttons below.

Figure 1-20. The Viewport Navigation Controls.
Try This!
1. Place a Teapot in the Front viewport. Click on the Zoom button and drag it on any viewport. That’s how it works!
2. This time click on the Pan View button. Place the hand pointer on any viewport and drag it. It allows you to pan around the viewport.
3. Click on the Arc Rotate button and click the Perspective viewport. Notice that a yellow circle appears. You can click on any of the four small boxes and drag on it so that you can view the object in perspective view without actually rotating the object. Or you can simply drag the Perspective viewport to freely rotate the object.
4. Click on the Front viewport then click the Maximize Viewport Toggle button. Notice that the Front viewport in maximized. If you want to return to the original four viewports, just click on the Maximize Viewport Toggle button again.
Moreover, the Zoom Extents All button allows you to zoom all objects in all the viewports at the same time. Try it!
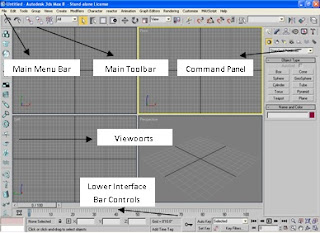
So that’s it! The Max user interface. As a review, I have prepared labels for the different parts of the interface below. So don’t forget!

Figure 1-21. 3DS Max User Interface.
In the next part of this blog, I will teach how to make your first 3D models!

No comments:
Post a Comment