A. FILE MANAGEMENT AND FILE EXTENSIONS

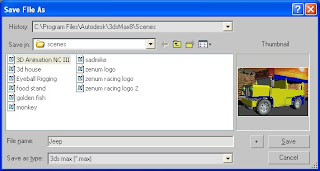
Figure 1-1. The ‘Save File As’ dialog box.
You can see a very familiar user interface at the top of Max. This is the Menu bar. Just like in any other applications, this bar always has the File menu, Edit and Views menus. However, in 3DS Max, there are more menus which are specifically for 3D animation. I won’t be discussing all of them here. You just have to get familiarized with the common menus that I’ll be using in this blog.
When you save your files, Max by default saves them in the ‘scenes’ folder. But you can always place your files anywhere in your computer. The ‘History’ box shows you where to find your files.
By the way, the file extension is MAX. That’s why often times we call our files as “Max files”. This is to indicate that this file is accessible using 3DS Max.
Try This!
1. Load 3DS Max on your computer.
2. Go to FILE, select SAVE AS.
3. On the SAVE FILE AS dialog box, type ‘test’ in the FILE NAME box.
4. Click on the SAVE button.
5. This time, open MY COMPUTER from your desktop.
6. Go to C:\Program Files. Look for the folder ‘Autodesk’, and double-click on it.
7. Open the folder ‘3dsMax8’, which is the version I’m using. Then, open the ‘scenes’ folder.
8. There it is! Your first Max file!

No comments:
Post a Comment